Identity and Access Management (IAM) is absolutely fundamental to a Cloud operation, however, sometimes you had to make allowances for certain scenarios. For example, in order to gain access to a Microsoft Azure environment the most common way for Software as a Service (SaaS) products was to ask a customer for a Service Principal / App Registration (SPN). This is an identity in the Azure Active Directory tenant and this typically then is used to connect a SaaS to Azure. This is still the case. That’s also how here at ARGOS we do it.
One thing that was a big worry for many organisations was the fact that once handed over to the vendor the organisation had no control over where this SPN was executed from. Technically, a person gaining access to the SaaS could steal the credentials and execute them from a different system.
Microsoft recently released Azure Active Directory Conditional Access for Workload Identities, which includes Service Principals.
ARGOS customers can now restrict the Service Principal for ARGOS to the ARGOS IP address that is known to customers.
Configuring Conditional Access for Workload Identities
In order to configure this feature Conditional Access needs to be enabled on the Azure tenant, for this a specific license needs to be applied to the tenant. Read here for more information.
From here it’s only a few easy steps to configure Conditional Access to block access to a Service Principal unless the request is coming from a known location.
- Configure a “named location” with the ARGOS Public IP as per documentation
- Follow the official documentation for this. The IP to be used for ARGOS can be found in your “My Account” menu.
- Create a custom policy
- Apply the policy
Creating a Custom Azure Conditional Access Policy
After the “Named Location” is created (Step 1 above) the Policy itself needs to be configured.
Roughly, we are going to follow the process outlined in the Azure documentation here, with a few little deviations.
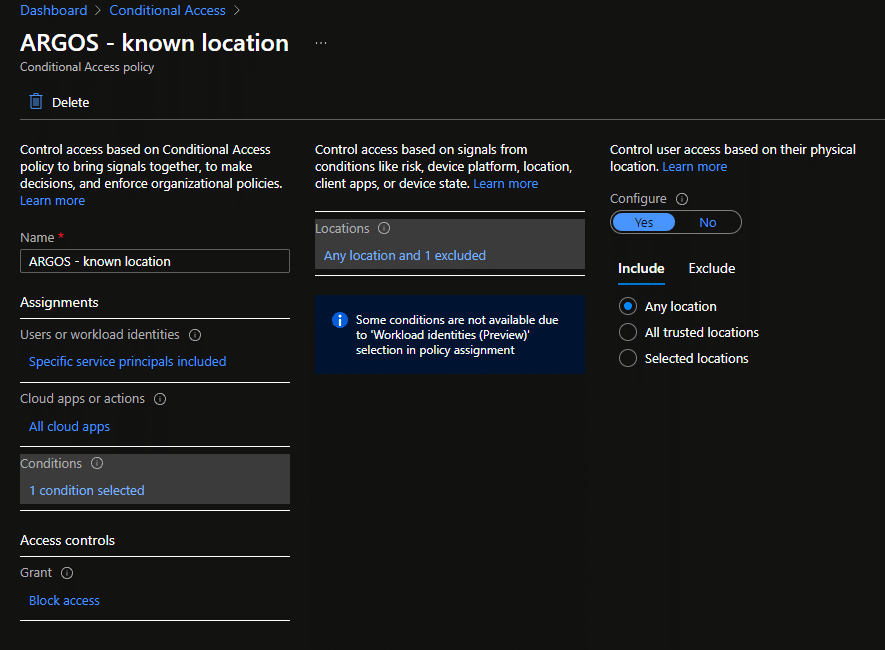
Under “Assignments” make sure to select “Workload identities” in the “What does this policy apply to?” dropdown and then select the service principal that you created for ARGOS (or another SaaS).
At this point under “Cloud apps or actions” we can only select “All cloud apps” which is fine for this scenario, but we also expect this to change eventually.
Next we need to configure the conditions for this policy and again, because we are configuring for workload identities, we only get “Location” as a condition. However, this is also exactly what we want.
For “Include” we select “Any location” and under “Exclude” we select the location we created above in Step 1 under “Named Locations”.
In plain English:
This Policy applies to the Service Principal as selected, any source IP except for the one we selected under “exclude”.
In combination with the “Block access” setting under the Access Controls this means that all requests by this Service Principal will be blocked except for those that come from the known location.
As a last step the policy needs to be enabled to “Report-only” or “On”. Make sure when enabling these policies you do not lock yourself out.
Once enabled eventually reports will flow through to the “Sign-in logs” page with all sorts of information about the requests that passed Conditional Access and the ones that did not.
If someone tried to use a Service Principal from any other location, then all they would see is this error message here.
If you are an ARGOS customer, go ahead and configure this on your Azure tenant. We highly recommend this as part of a secure cloud environment, for ARGOS and for every other SaaS you integrate.


